Guitar Playing Tips For Beginners
What do beginner guitar players need to learn to play the guitar? There are a few basic tips and stages to learn in order to help a beginner guitar player understand how to play. Once you know those steps, it's all uphill from there. Here are some of the best guitar playing tips for beginner guitar players:
1. Learn The Notes
2. Learn Guitar Chords
3. Hammer-ons and Pull-offs
4. Guitar Bending
5. Guitar Slide
6. Guitar Vibrato Technique
1. Learn The Notes
This should go without explaining, but if you don't know what notes you are playing on the guitar, you will never be able to optimally communicate with other musicians on what you are playing. Have you ever had one of these situations?:
"Play this note?"
"What is that?"
"Not sure...it's up about 6 frets"
(Playing piano) *ding* *higher ding* *higher ding* *higher ding*
"Yeah, there it is! Now this one"
"What is that?"
(continued)
Honestly! Who has time for that?!
Now, once you learn the notes, you will forever have it with you moving forward. Learning the names of the notes you're playing on Guitar is especially important if playing blues. Most blues bands will say a key, and you MUST know that note as soon as the band starts, otherwise, it all falls apart, and you look like a goofball (and nobody wants to be a goofball).
Now, it just takes a little bit of memorization - take it as a small challenge. Once you learn it, you will feel great that you are progressing and now know more than 75% of all 'guitar players' out there.
First, all notes go in alphabetical order from A to G, and then repeat so ~
A B C D E F G - A B ...
(Now, there are what are called flat
and sharp
notes as well which are the notes in between the majors. But right now you want to focus on the majors only so you don't get overwhelmed)
So Knowing that the low string (6th String) without placing any finger on the fretboard will be an E
note. It will be much easier to show you ~
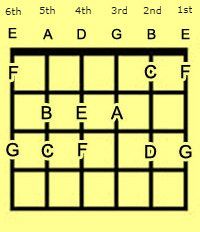
On this photo, it shows you the strings as if you are looking straight at the strings going vertical starting from the low string (6th String)
on the Left, all the way to the high string (1st String)
on the Right.
You will notice the 'E A D G B E' above the grid implies these notes are played without any fingers on the frets. So, if you play the low string (6th String) without a finger on any fret, that would be an E note. If you move up a string (5th String), playing without a finger on any fret, that would be an A note, and so on...
On the grid, every line represents a
fret
- which on your guitar is represented by the thin metal lines over the neck.
-
Looking at the grid chart, notice where the 'F' is on the left side? This means the
F
note is on the 1st fret
of the low string (6th String). So if you place your 1st finger on that 1st fret
of the low string, you are now playing an
F
note.
-
Now, the
G
note will be on the 3rd fret
of the low string (6th String). So if you place your finger on that 3rd fret
of the low string, you will be playing a
G
note.
-
Once you understand this, you can move onto the next string - using the same idea, only the
B note is on the 2nd fret, and the C note is on the 3rd.
---------------------------------------------------------
After that, you can practice every string all the way to the 1st string. What helps is if you say the note out loud - it helps your brain remember after repetition, and eventually you will never need to say it out loud, nor look at this grid again. This might be a bit of information so we suggest just it take one step at a time so you will not be overwhelmed.
Now, this is only the beginning, but once you have mastered this - you are off to a
FANTASTIC
start!
After this, you will notice that once you start playing the higher frets, many of them match the note on the next higher string, and since you now know the name of that note, you will begin to understand what the name of each note is on the higher frets.
2. Learning Guitar Chords
Next, you want to learn basic chords. Chords are simply multiple notes played at the same time.
Now, the same grid structure above can be used here as well, only every note is played at the same time. Some of the chords show you how to place your fingers on the notes with a '1 2 3 4' with 1 being your first finger and so forth. Others only have dots, so you'll have to figure out what feels comfortable for you to play every note. Here are some great basic chords to start:
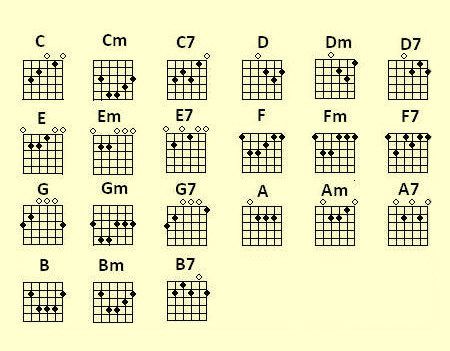
On the chart, if a chord has an 'o' above the grid, then that means that you play that string open with no finger on a fret. If there is no closed or open circle, then you skip that string as it is not a part of the chord.
Also, you may notice a few of these chords have 5-6
notes to play. What you want to do in that situation is bar that entire fret, you bar the fret by pressing the whole length of your finger (typically your 1st finger) across the suggested fret to play multiple notes with only one finger and then add the rest of the notes of the chord with the other fingers.
Typically when starting to play bar chords, the guitar will buzz alot. But don't worry - all guitarists have to go through this. You have to build muscles in your fingers that you never had to really use before. Once your finger muscles are strong enough, the chords will sound nice and clear.
3. Hammer-ons and Pull-offs
This is a great guitar technique to quickly learn when starting to play guitar. The names of both of these guitar techniques kinda tell you what these are, but just to clarify:
Hammer-ons are when you play a note but quickly add another finger on a high fret to essentially swoop into another note.
For example, say you play an F
note (6th String, 1st fret)
with your first finger, then you would use your 3rd finger to quickly press the 3rd fret
- this would be considered a hammer on.
Pull-offs
are the exact opposite where you would play one note and release your finger from the fret to reveal another lower note, be it either another note pressed with another finger or an open note.
4. Guitar Bending
Guitar Bending is a pretty straightforward technique in which you would play a fretted note and with that pressed finger you would push the played string up or down essentially bending the noise of that note. You can bend a '1/2 Step'
which would essentially match the next fret as if you played it or a 'Full Step'
where you essentially match the note 2 frets up the neck.
5. Guitar Slide
Another straightforward guitar technique in which you play a pressed note and with that pressed finger you will slide that finger up OR down the neck creating a sliding sound effect.
6. Vibrato Guitar Technique
Now, this guitar technique is a little more difficult to master but makes your guitar playing come from sounding flat
to singing. There are a few Vibrato Guitar Techniques, but the more common vibrato technique is when playing a fretted note, you pivot the side of your 1st fingers knuckle (essentially your 1st fingers palm knuckle) on the guitar neck and you roll your hand back and forth while keeping the pivot on the guitar.
Here's a great vid to explain it a little better~
That's It!
Eventually, you will master all of these and you will come off as a guitar-playing pro.
*Now, a good thing to note is that most guitarists study scales, or guitar tablature (guitar tabs), or even chord progressions but we feel that all of these techniques we've shown you here are ALL the foundational tools that you will need to know and learn.
If you go the route of studying scales, or other peoples music - it will take you THAT
much longer to find your own unique sound. We have been around countless guitar players that try to remove themselves from the structure they've been taught and conditioned to play and just can't seem to break out of it.
We suggest after learning these tools to just sit down and play and you will obtain your guitar style much faster.
Hopefully, you got something out of this. If you want to read more, we have a great list of recommended best
electric guitars for beginners.
Related Articles
Guitarist Pedalboard Rundown - Courtney Barnett
We broke down what Guitarist, Courtney Barnett, is using on her live sets
